
How to Create a Virtual Tour
Virtual tours have become one of the most powerful ways to present places online. Whether you’re showcasing a property for sale, introducing a hotel or resort to future guests, or sharing a cultural space like a museum or gallery, a virtual tour allows people to immerse themselves in an environment without physically being there. This not only improves accessibility but also helps build trust, inspire engagement, and drive faster decision-making.
At the heart of a virtual tour is the 360-degree panoramic image. Unlike traditional photos, which show only one angle, a 360° image surrounds the viewer in every direction, creating the feeling of actually standing inside the space. When multiple images are linked together, users can “walk” through the environment, moving from room to room or location to location as if they were truly exploring it. Additional features like hotspots, embedded videos, and info panels can further enhance the experience, making virtual tours not just visual, but interactive.
The process of creating a tour is easier than many think. Modern platforms like 360are are designed to remove the technical complexity, so you don’t need coding knowledge or specialized software. All you need are 360-degree photos (captured by a 360 camera or created through stitching software) and a simple workflow to upload, customize, and publish your tour. In this guide, we’ll walk you through the exact steps to create your own virtual tour using 360are.
Step 1: Sign In to Your Account
- Visit 360are.
- Click the Sign In button at the top-right corner of the homepage.
- Enter your username and password, then click Sign In.
Don't have an account yet? Create one by registering — it’s quick and free to get started!
Step 2: Upload 360-degree Photos
- Go to Asset Upload
- Drag-and-drop or select one or many 360-degree photos. Wait until all photos are successfully uploaded and processed. Read more about the upload process here.
- When finished, your 360-degree panoramic images can now be found under All Assets menu link.
Check Supported 360° Photo Formats and Image Dimensions if you are unsure whether the exported images are ready to upload.
Step 3: Navigate to the VR Tour Editor Section
- Once 360-degree photos are uploaded, click on the VR Tour Editor link on the left side menu.
- Click + Add Assets button to select images for the tour.
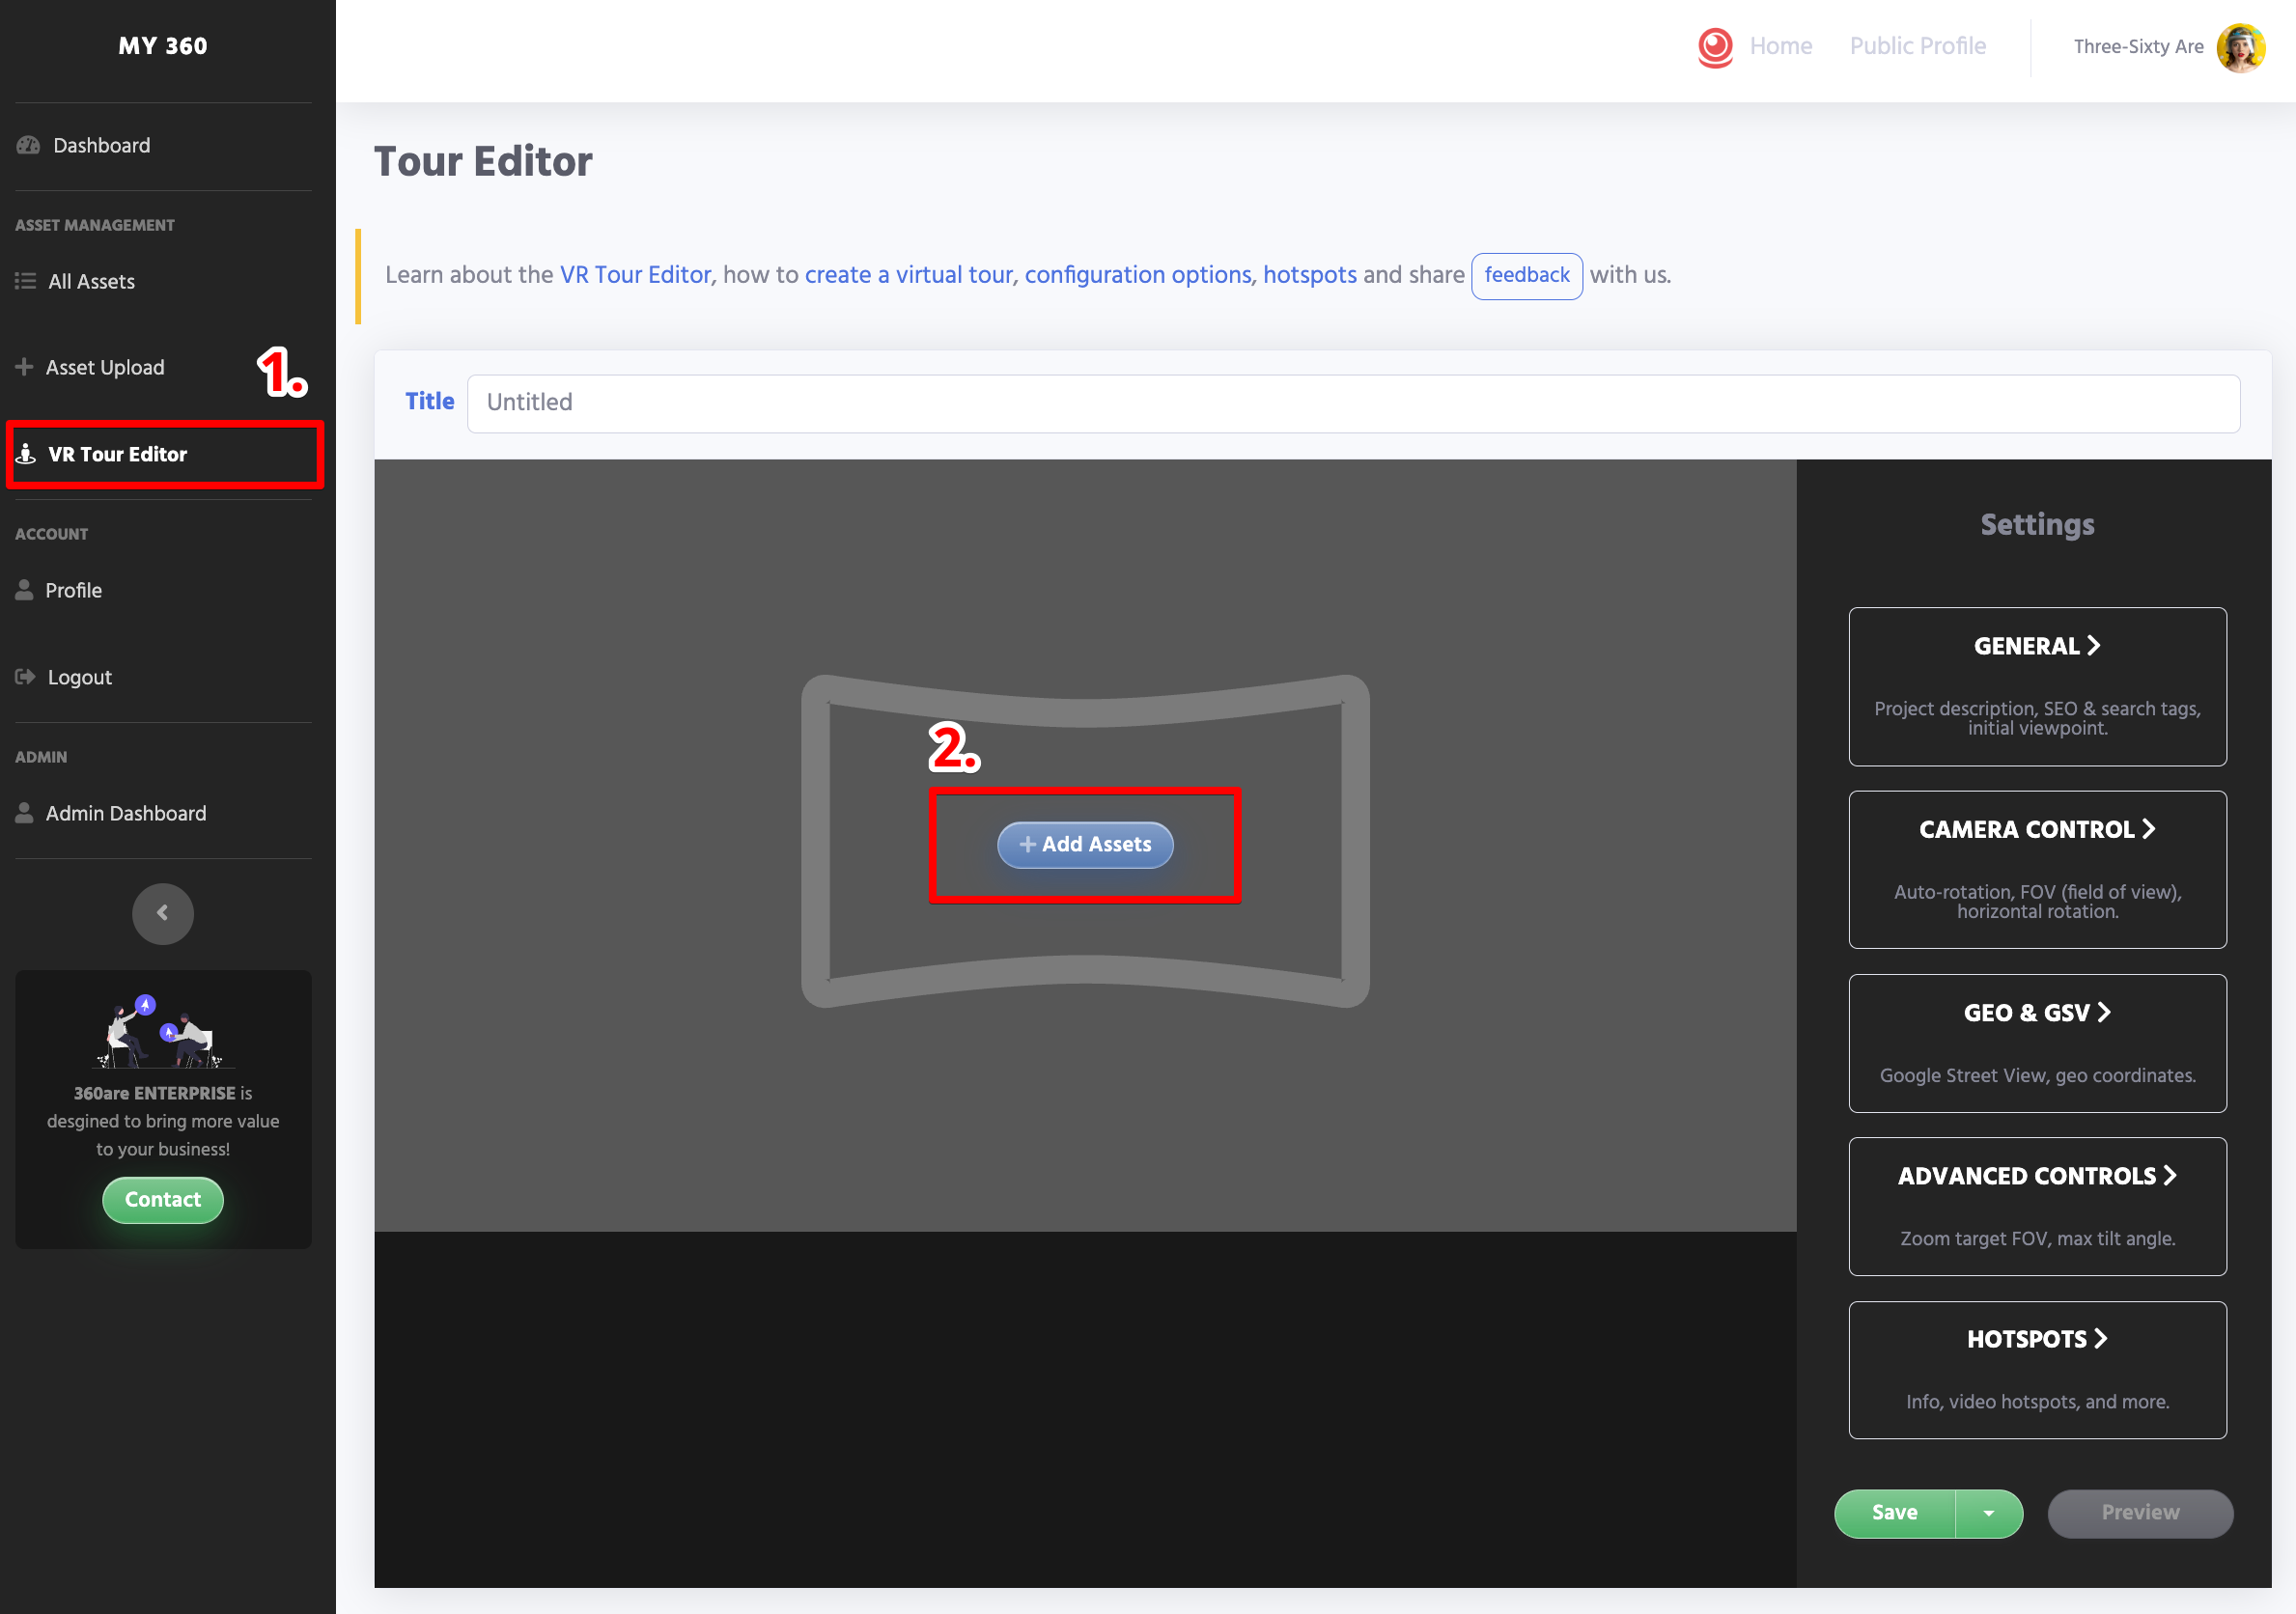
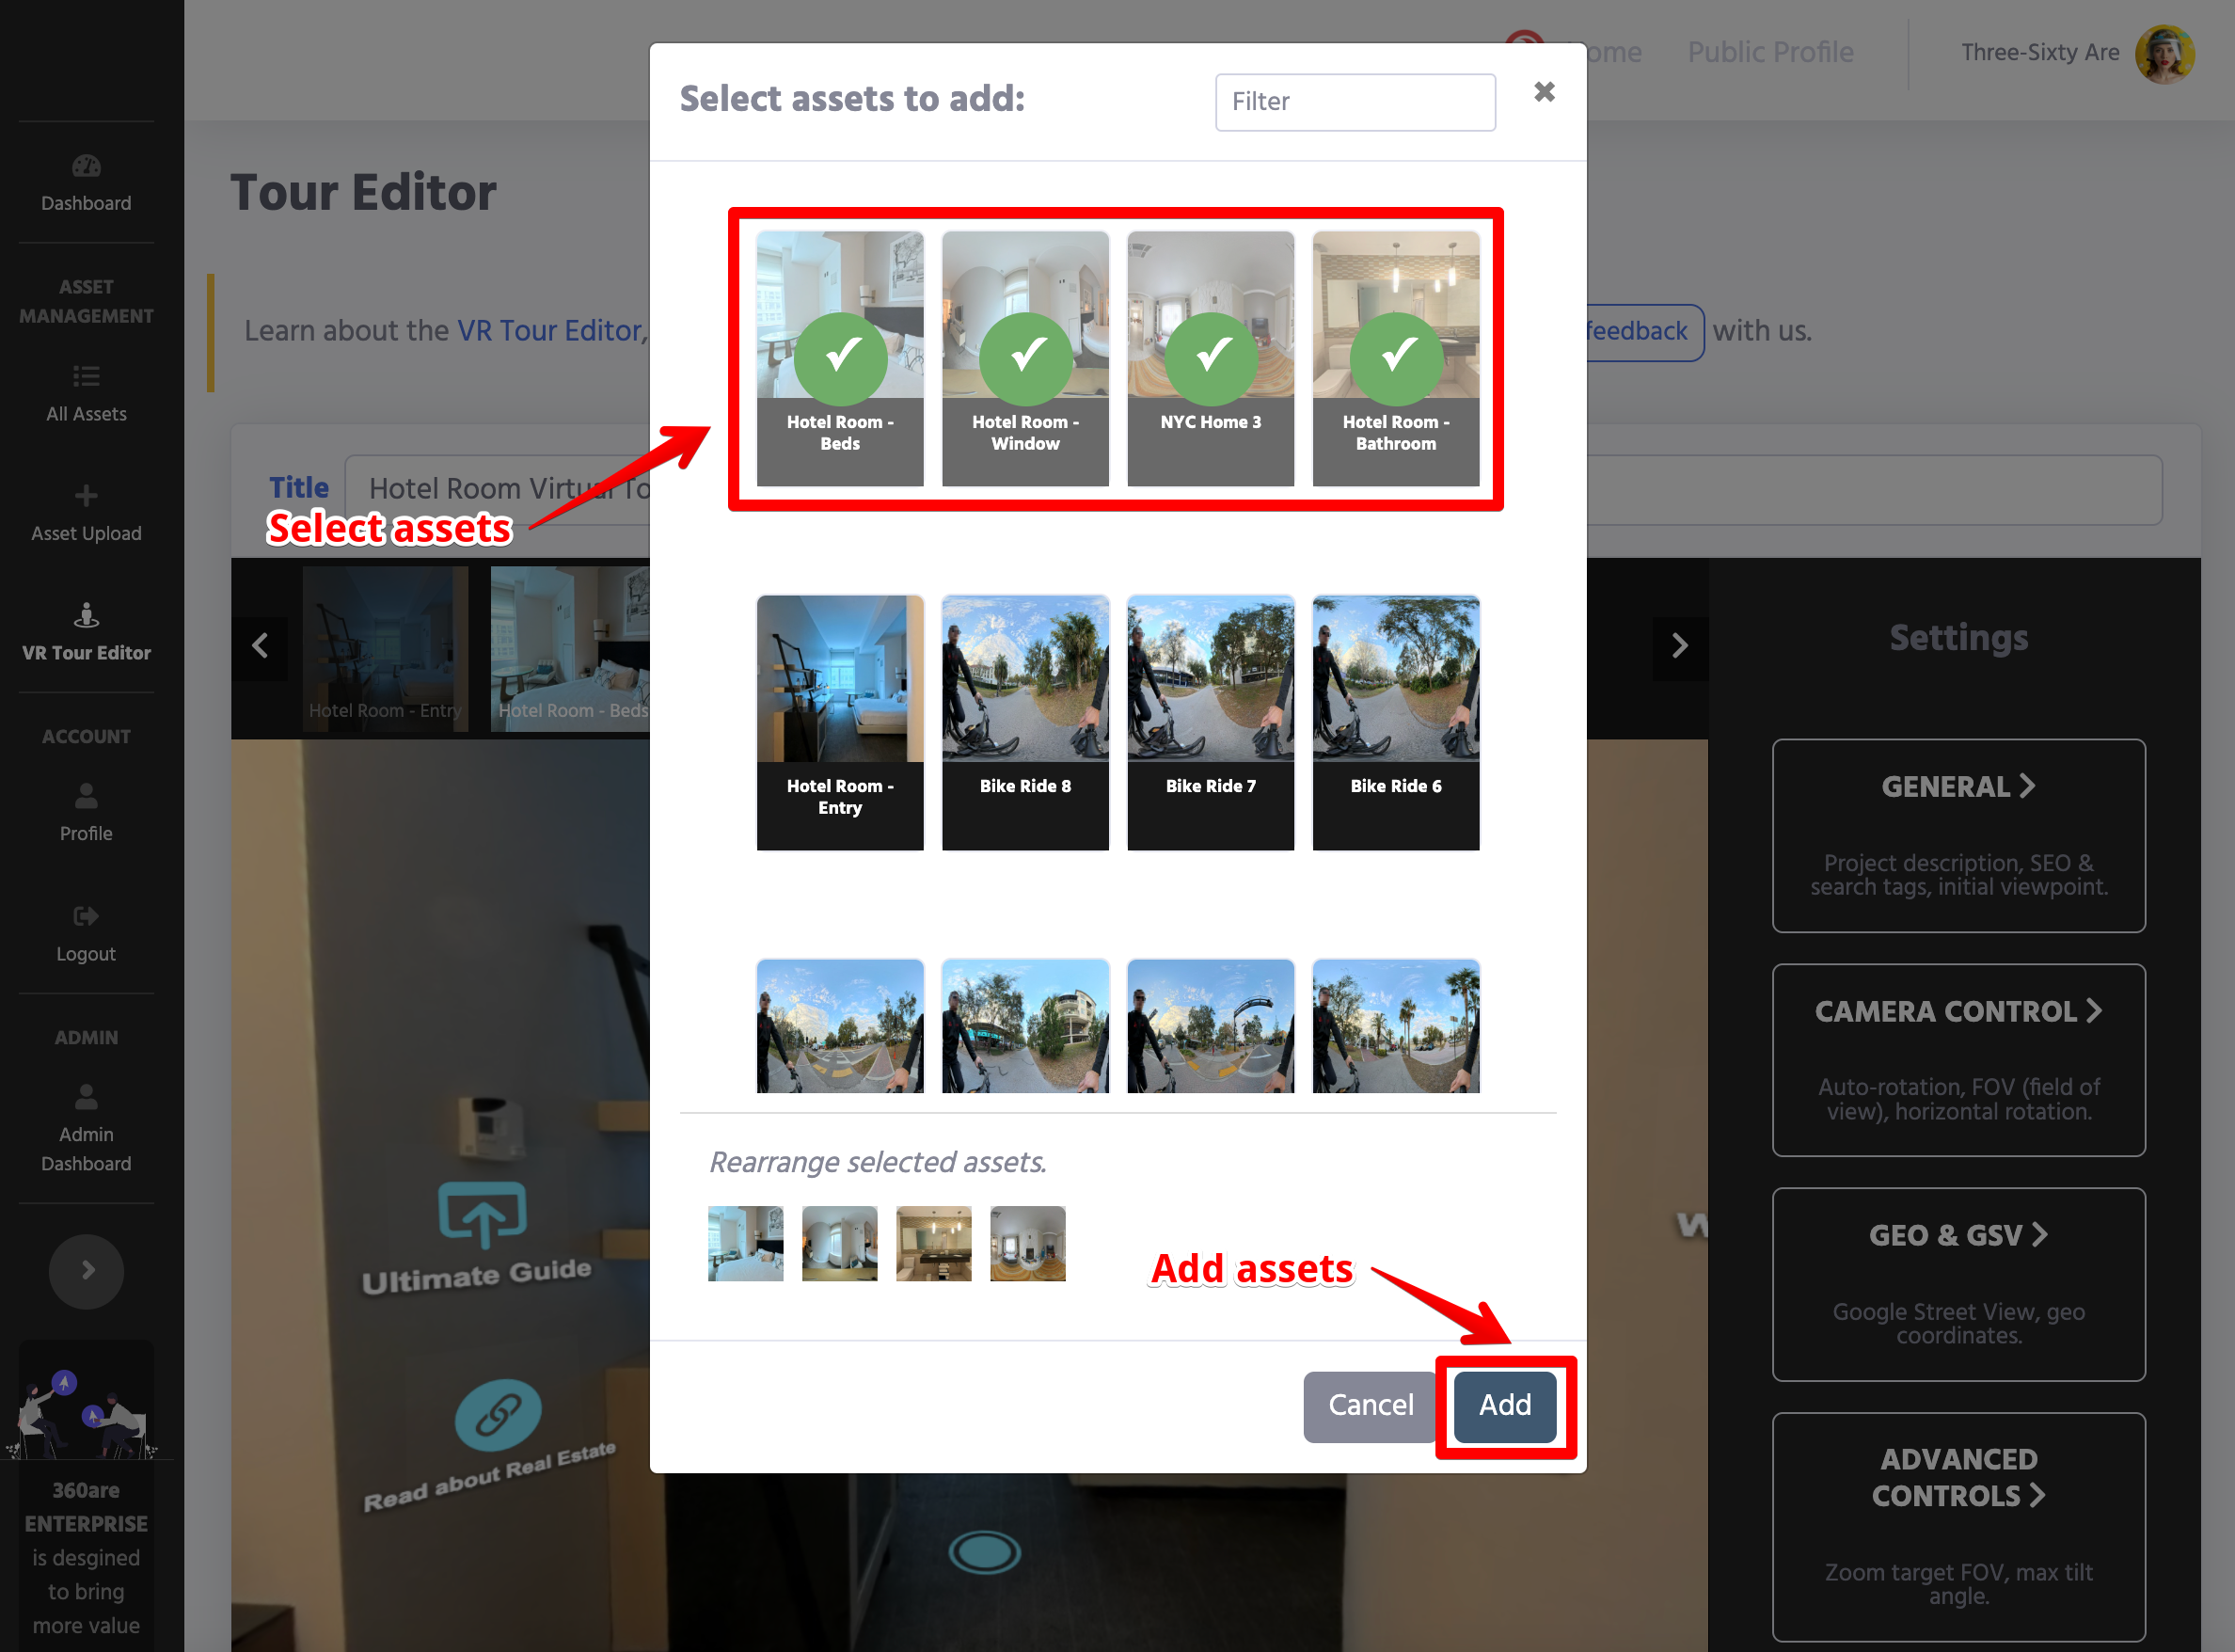
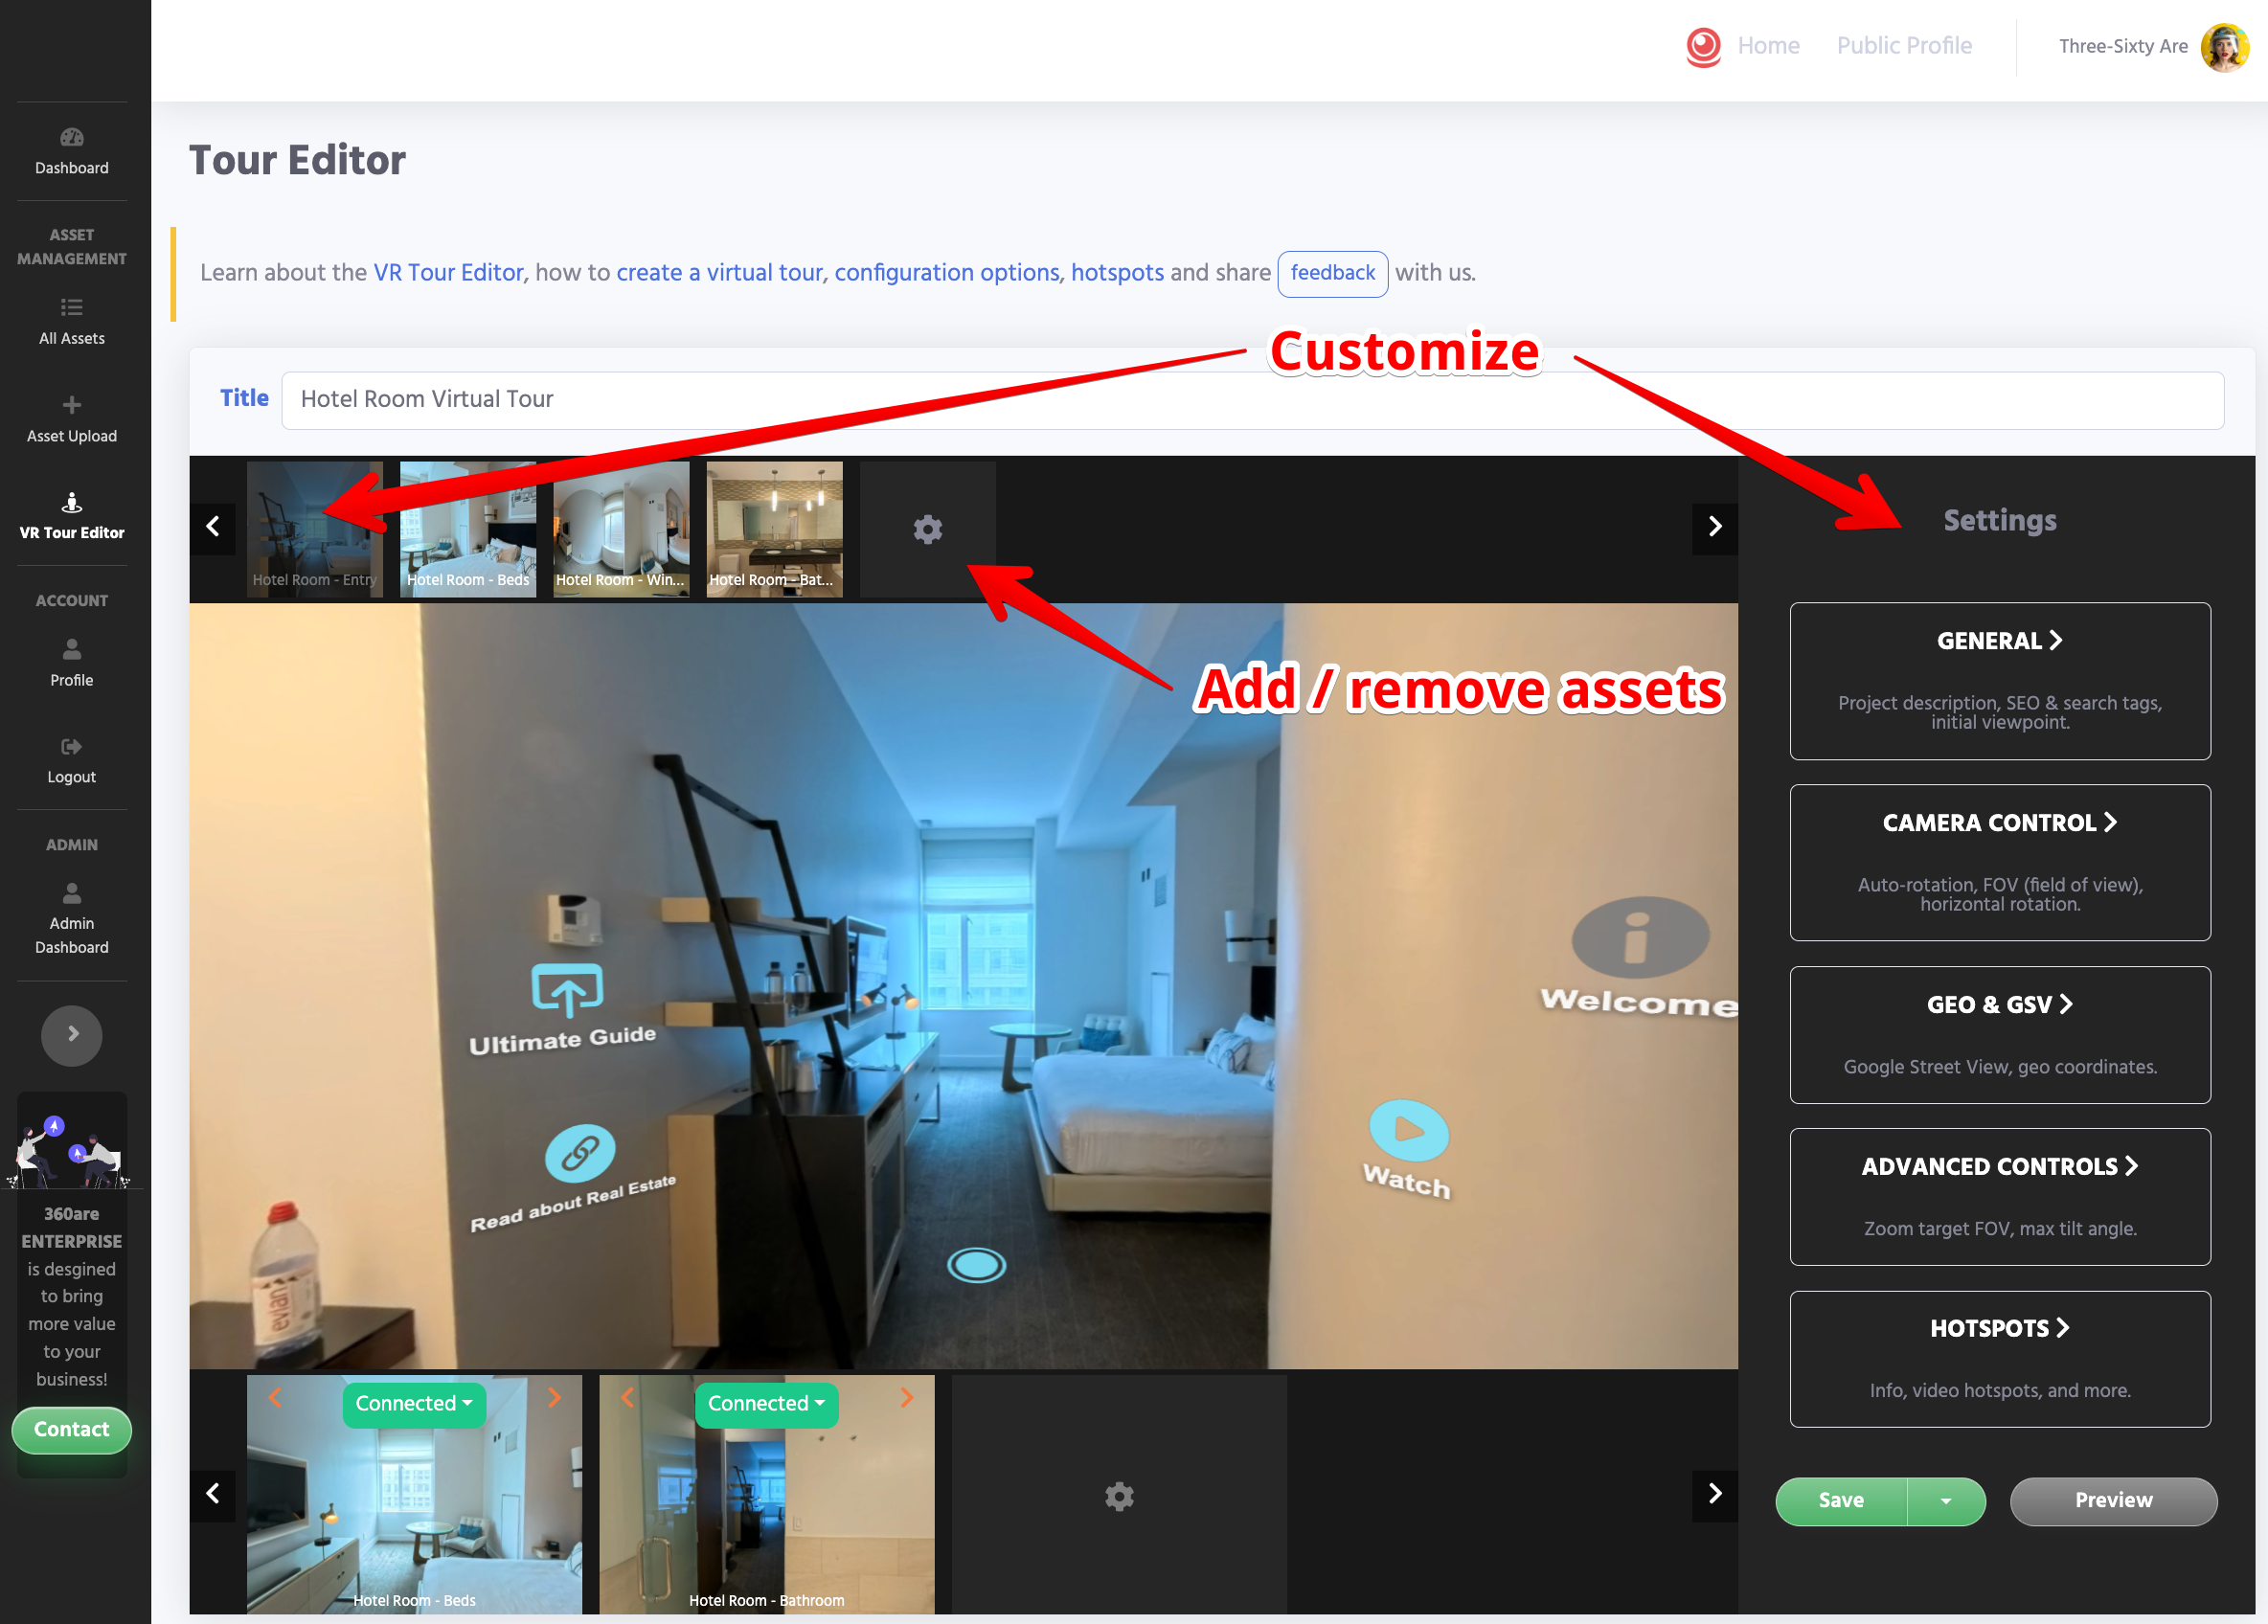
- Once selected and added, you can click each thumbnail image to load the panorama view to customize further.
Step 4: Rearrange Scenes
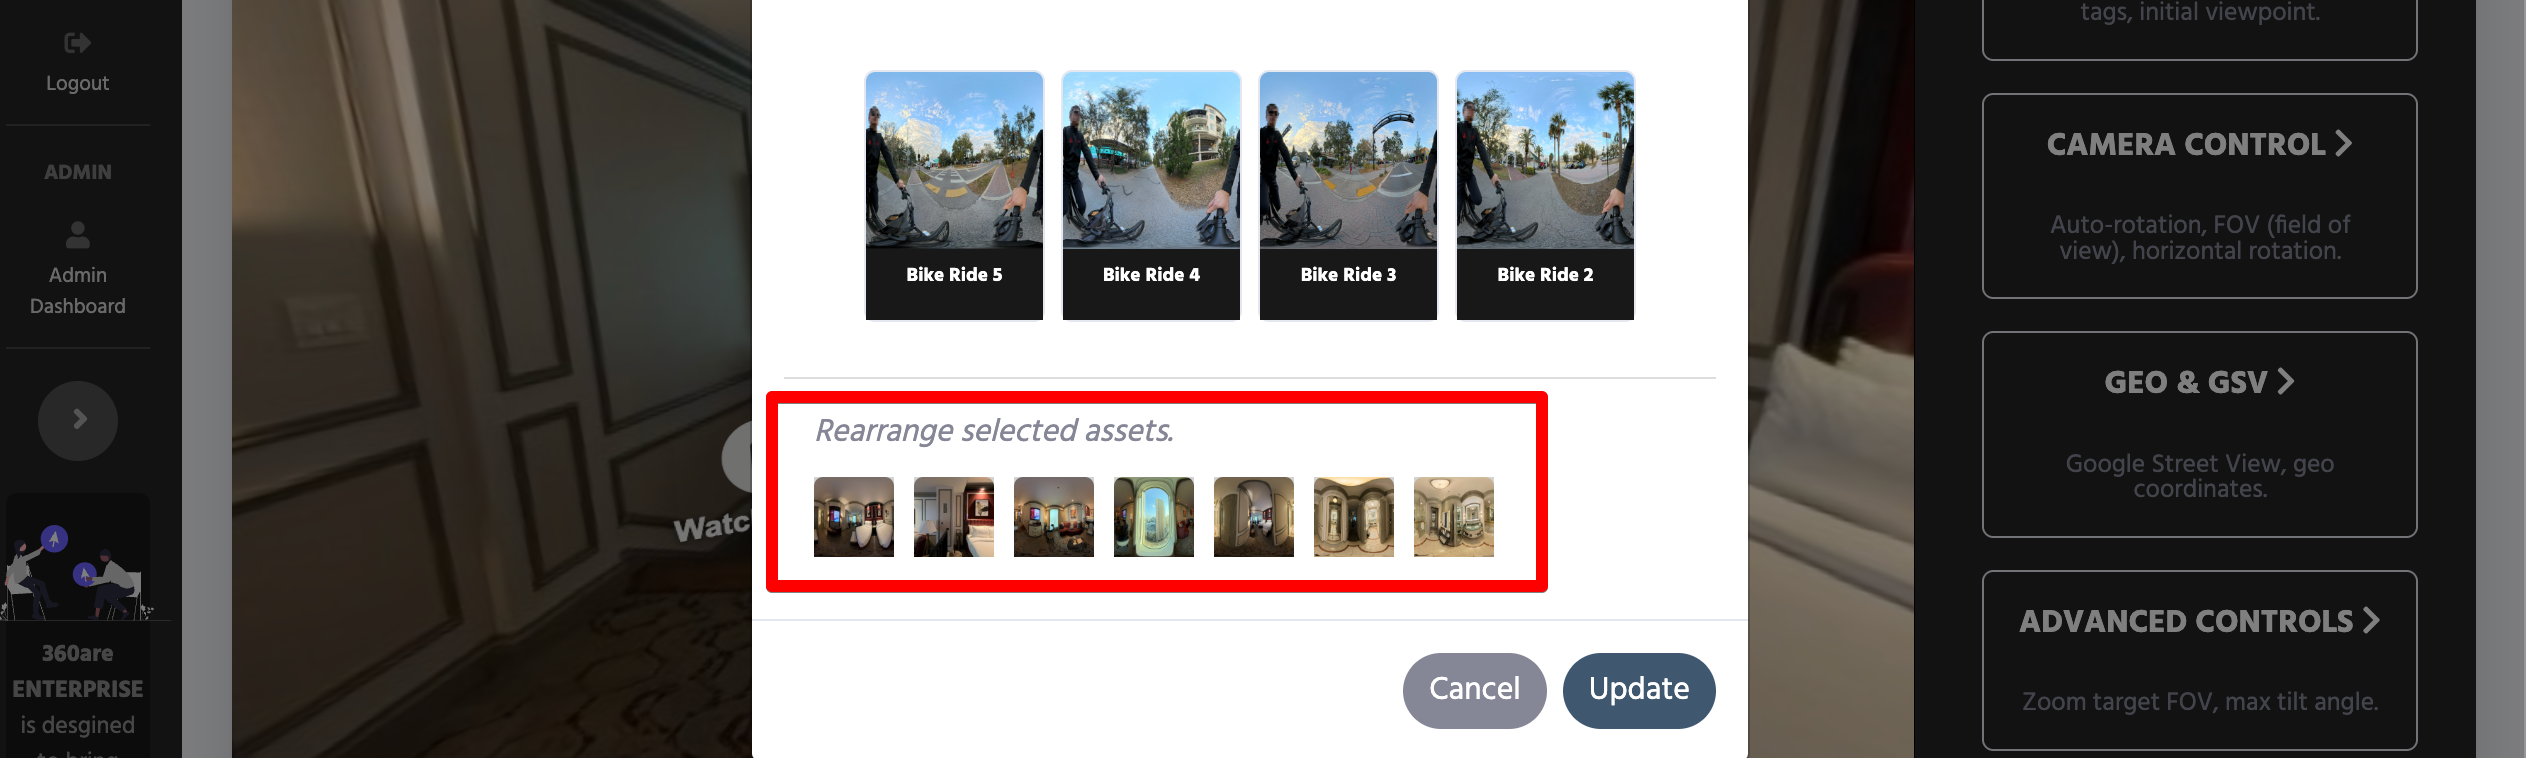
After selecting assets, you can rearrange them so the tour follows the correct viewing path. Rearranging can be done by opening a gear icon and changing the order of selected assets.
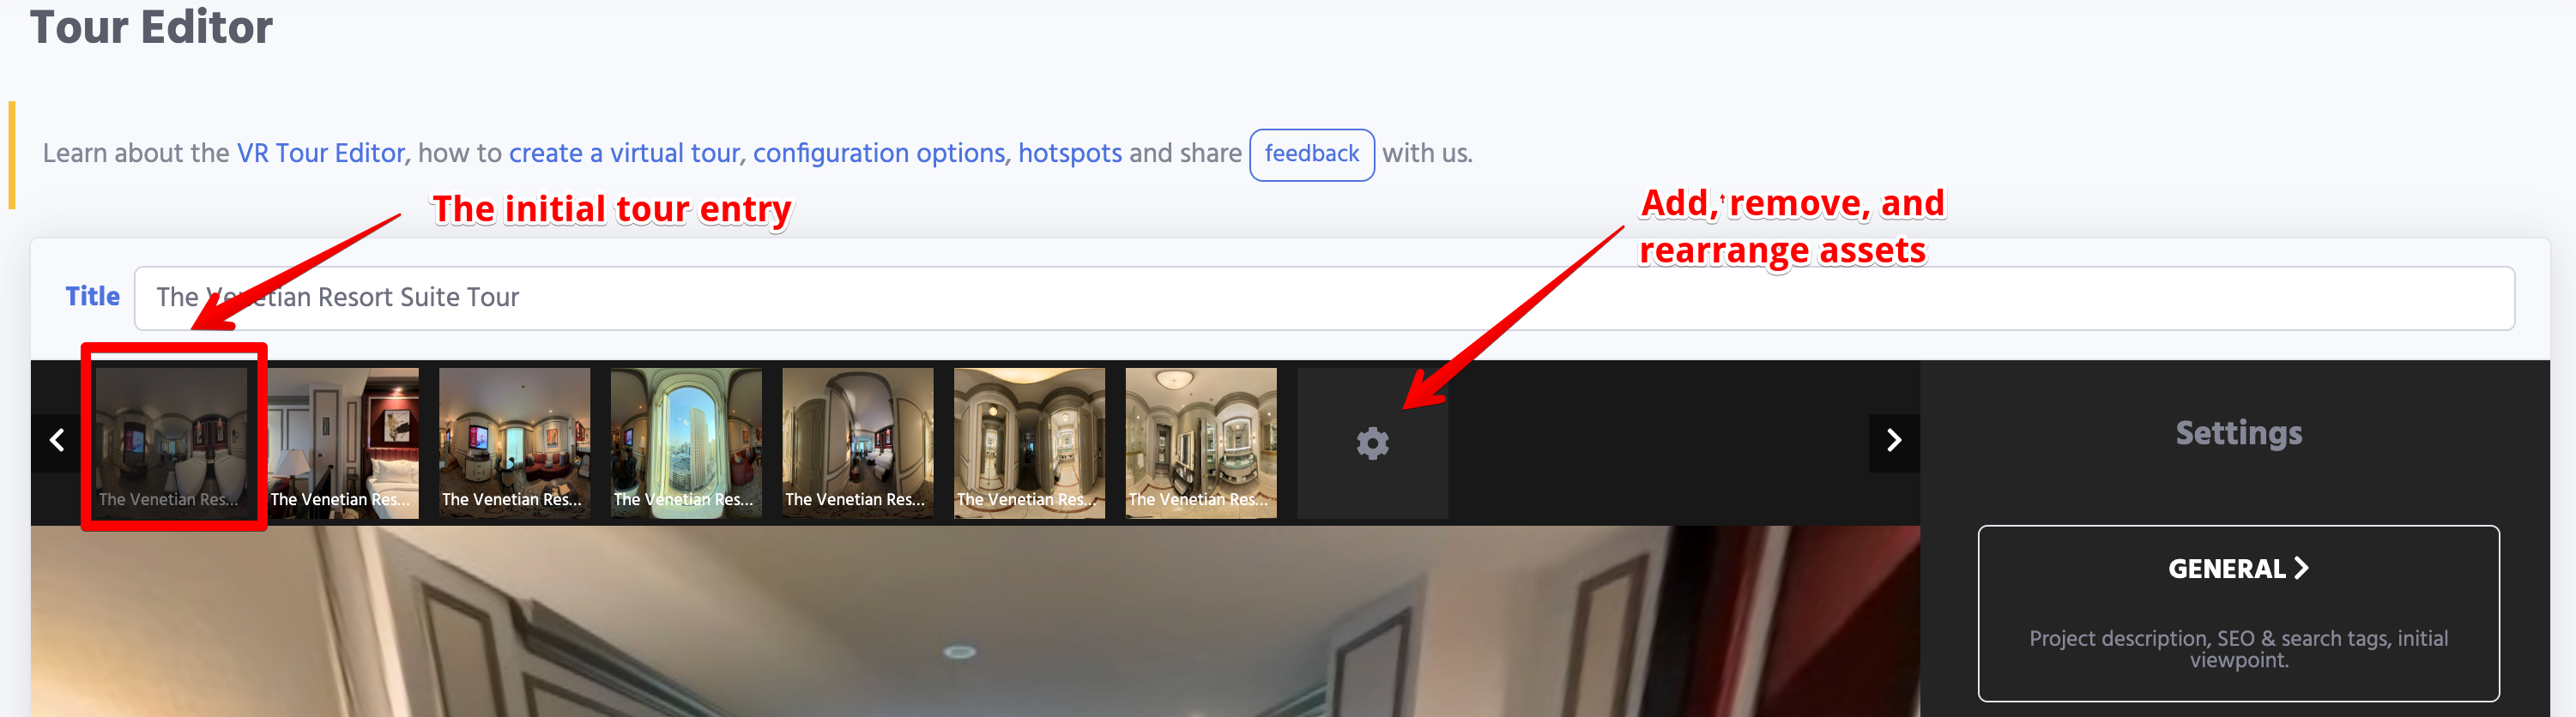
Use this to control the order in which scenes appear in the tour and to make editing easier. A logical scene order helps visitors understand the layout and move through the space naturally.
The first asset will be the main entry panorama image. The rest of navigation depends on how you connect the scenes and hotspots.
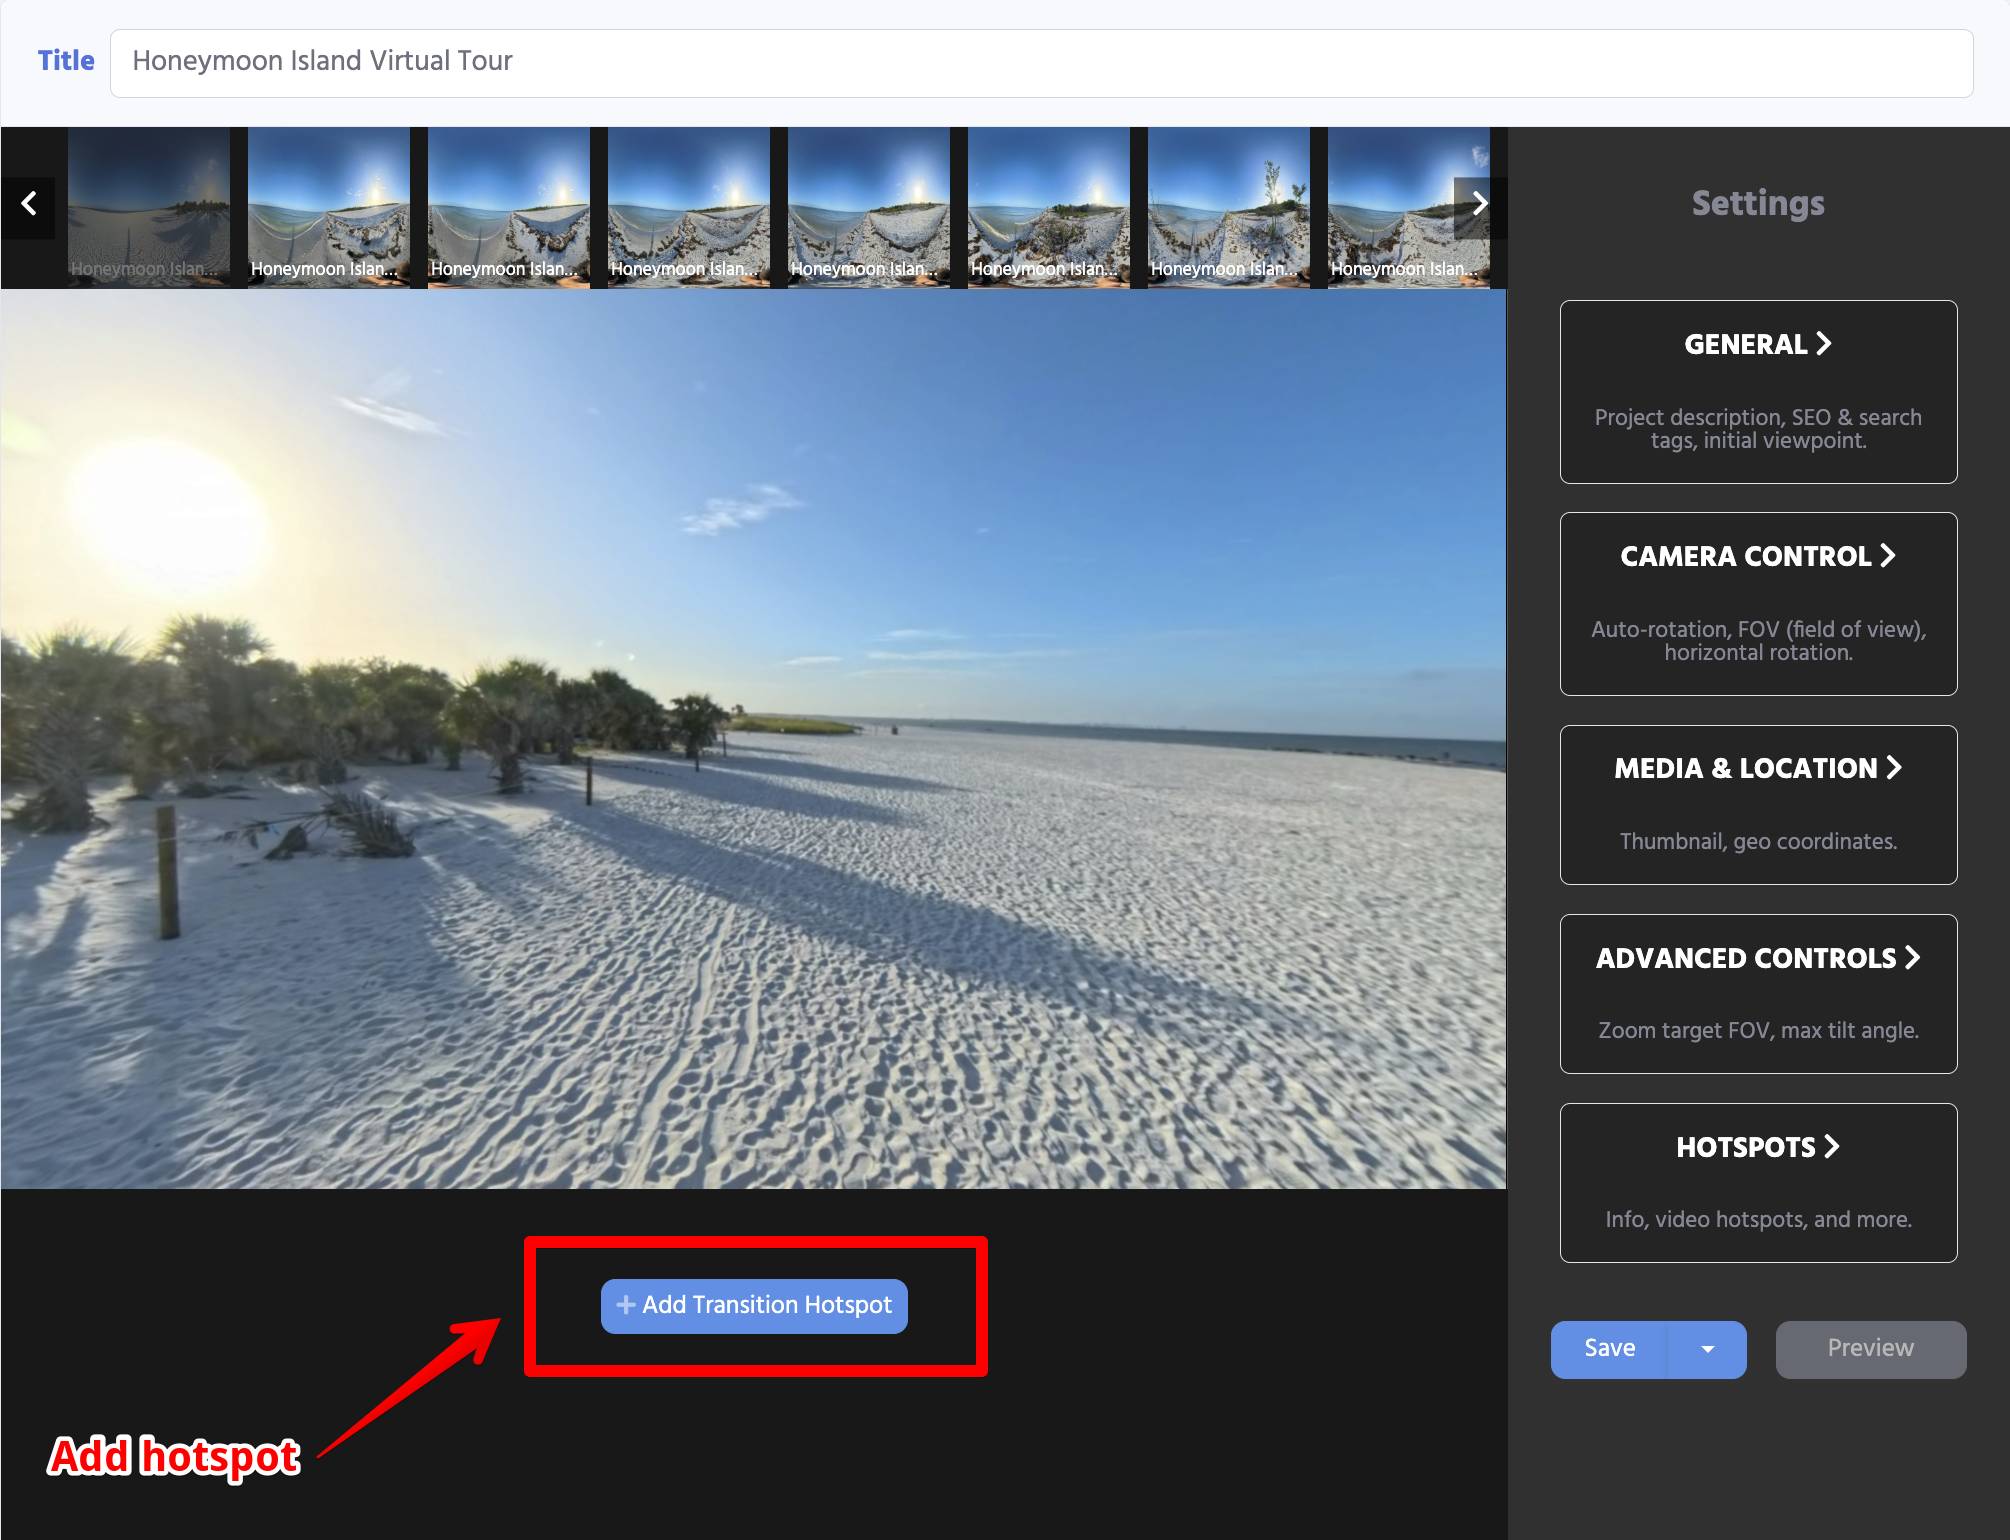
Step 5: Add Transition Scenes and Hotspots to a Virtual Tour
- To add a scene and hotspot, click + Add Transition Scene & Hotspot button and select another panorama image to link to.
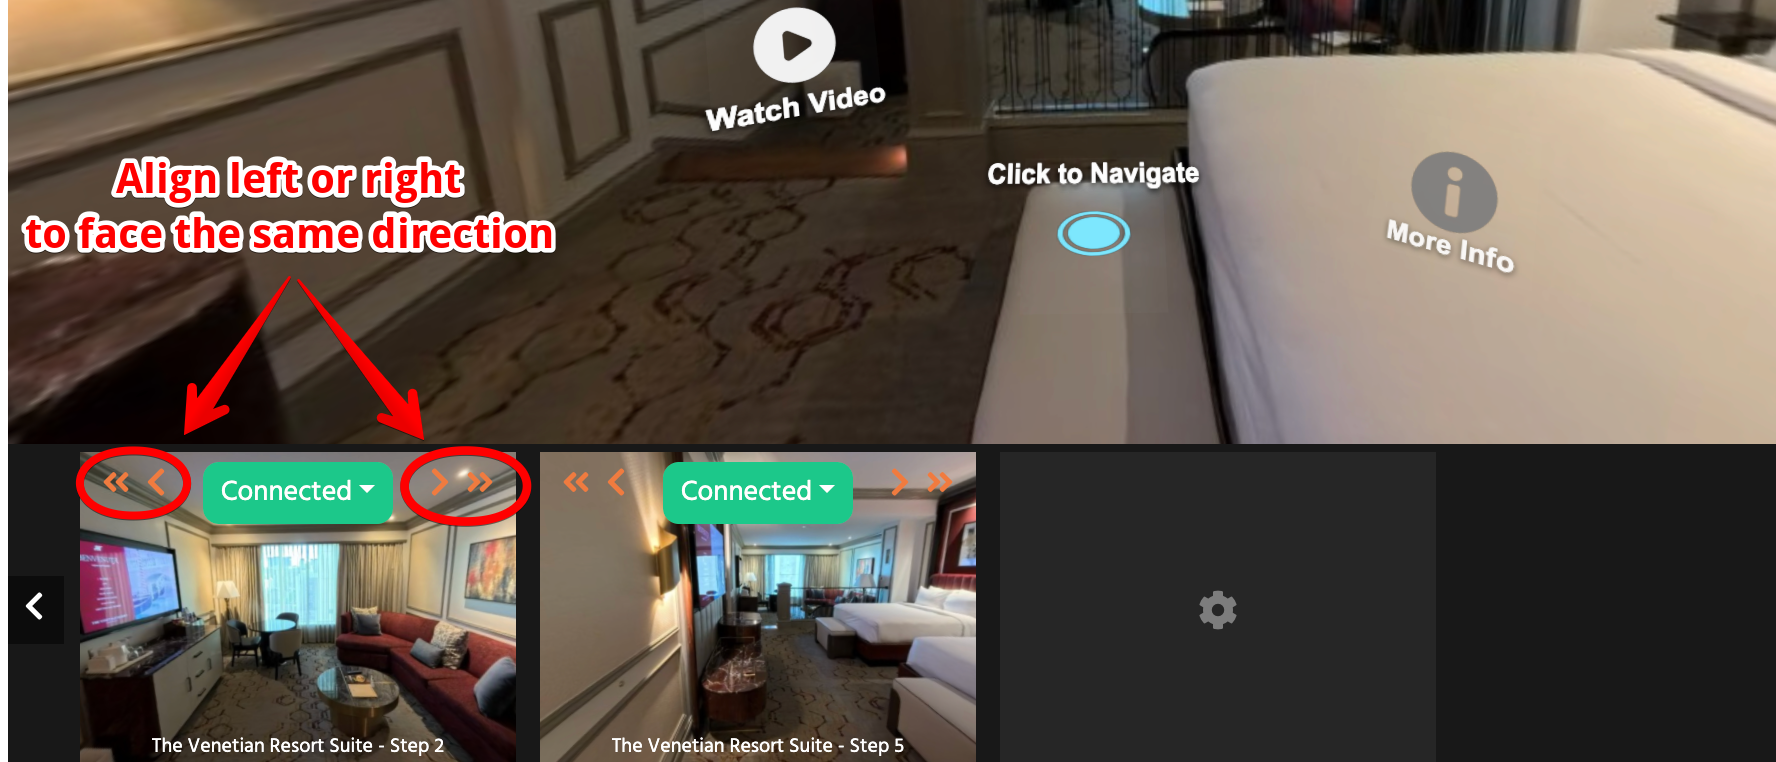
- Important: for better results, align added scenes with the main scene to face the same direction.
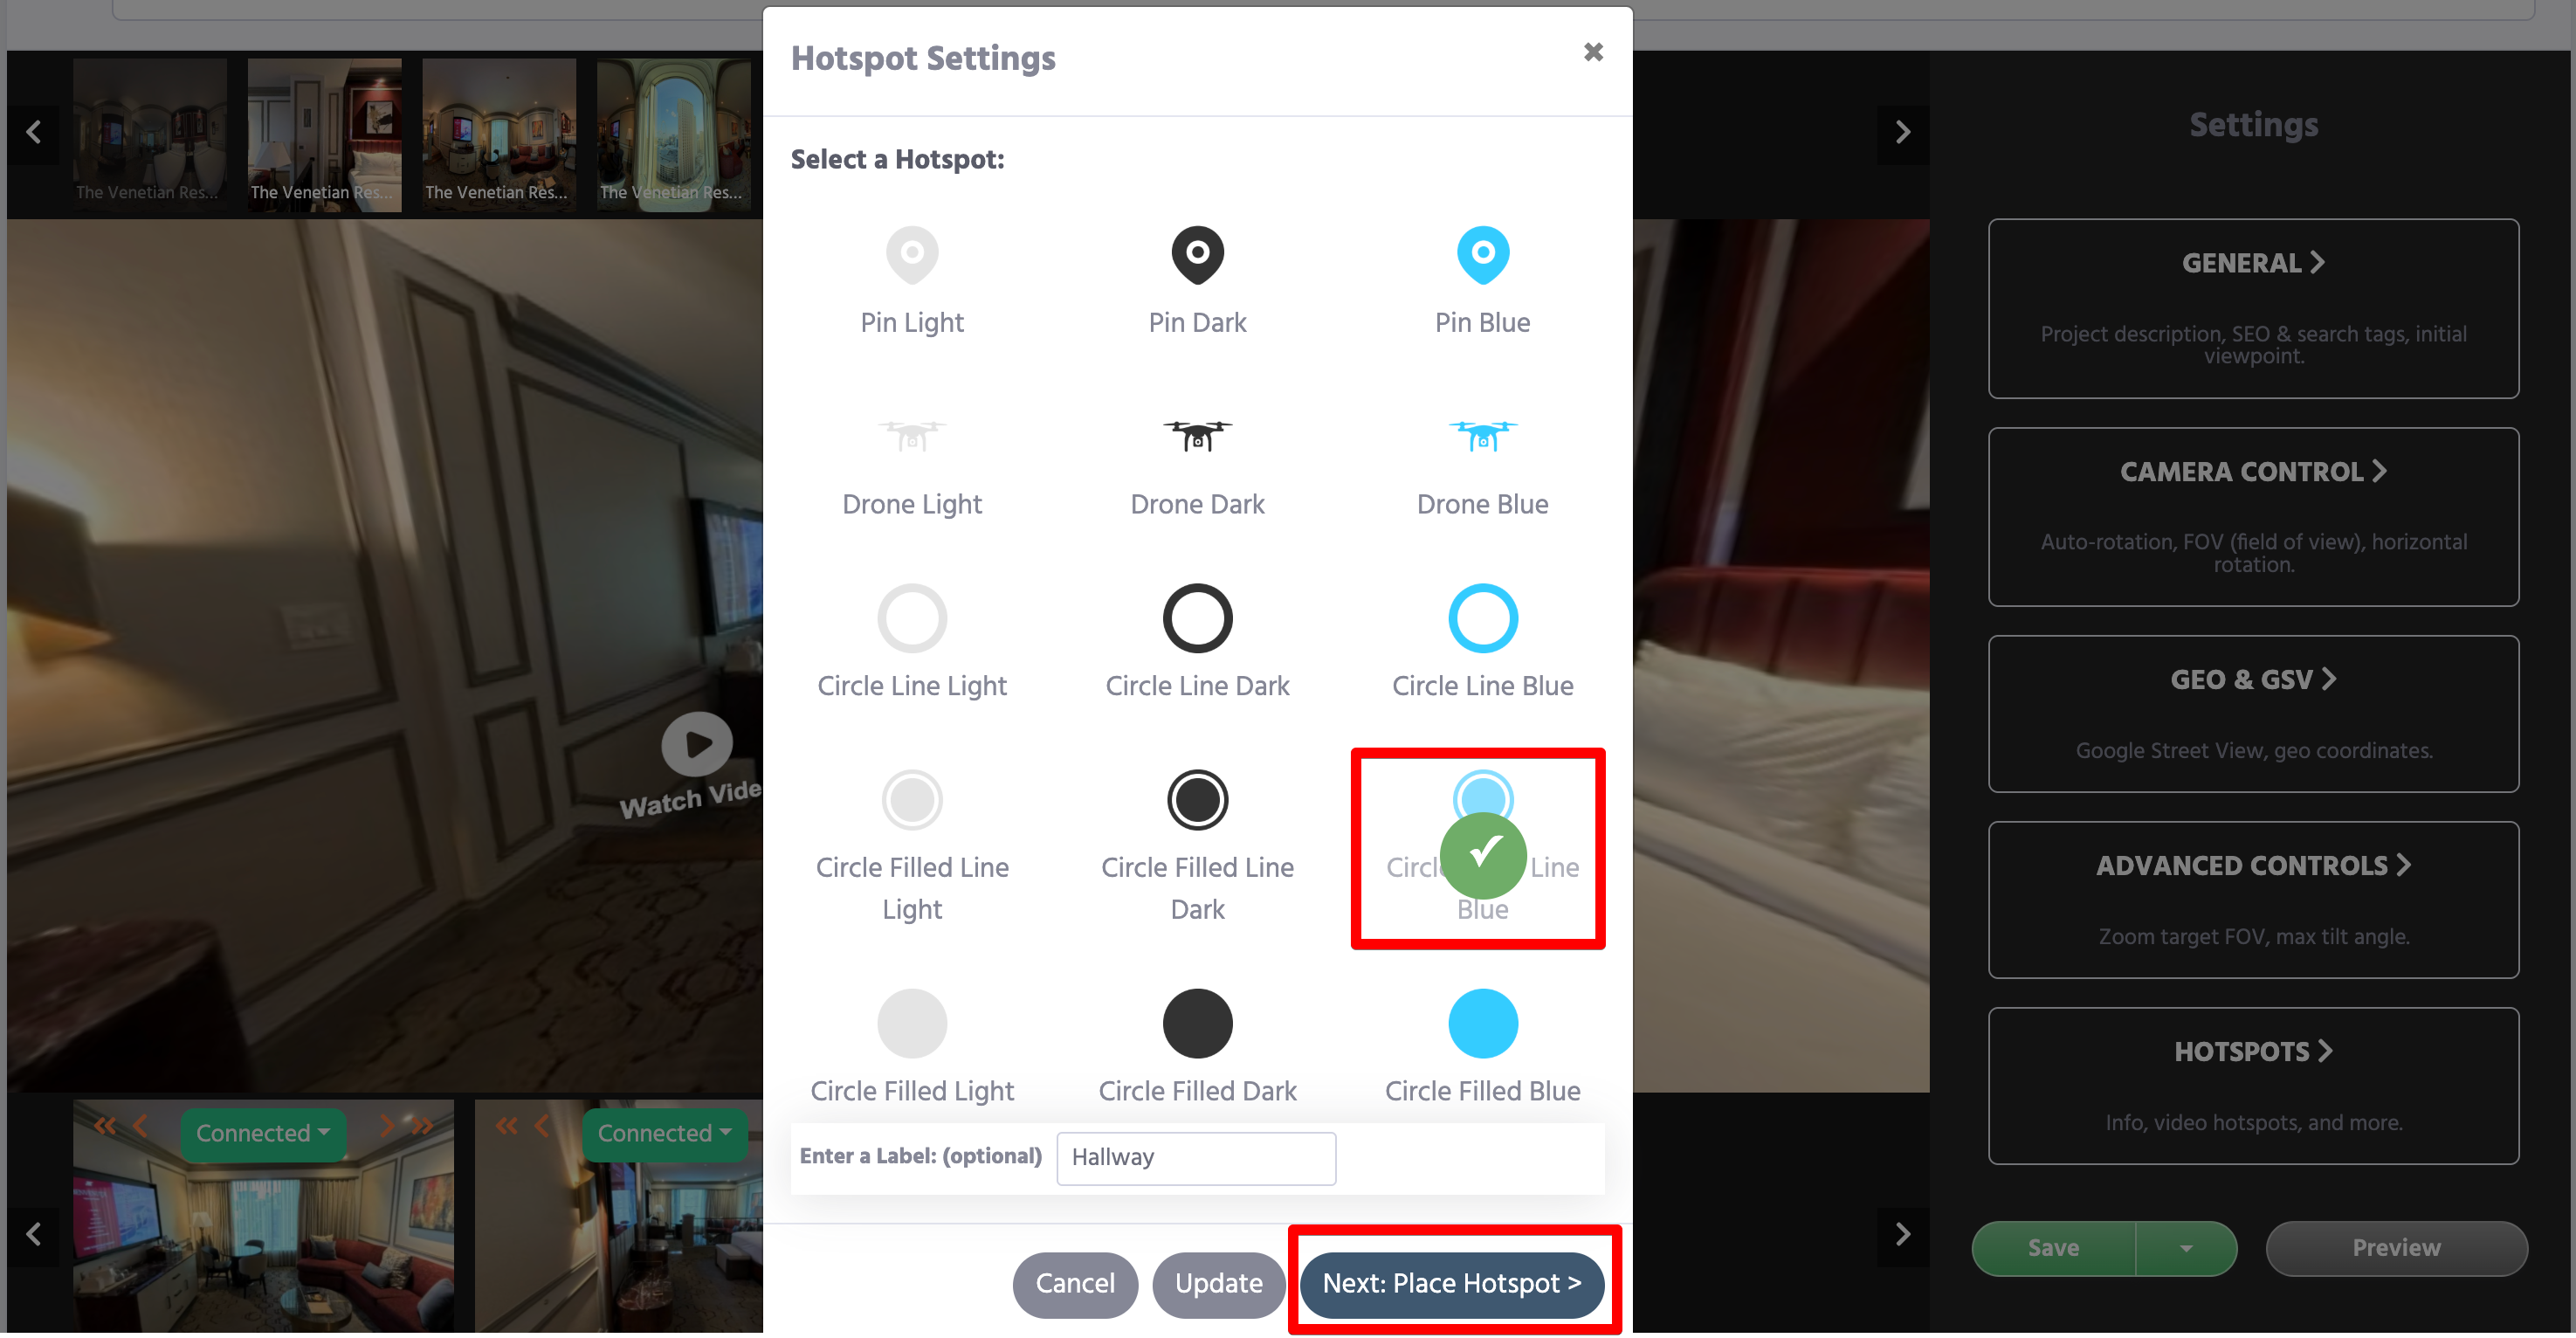
- After aligning, click Disconnected > Add Hotspot button to select desired hotspot icon image, optional label, and Place Hotspot button.
- Click anywhere within the main panoramic image to set the hotspot. When hotspot is added, the button will turn to Connected.
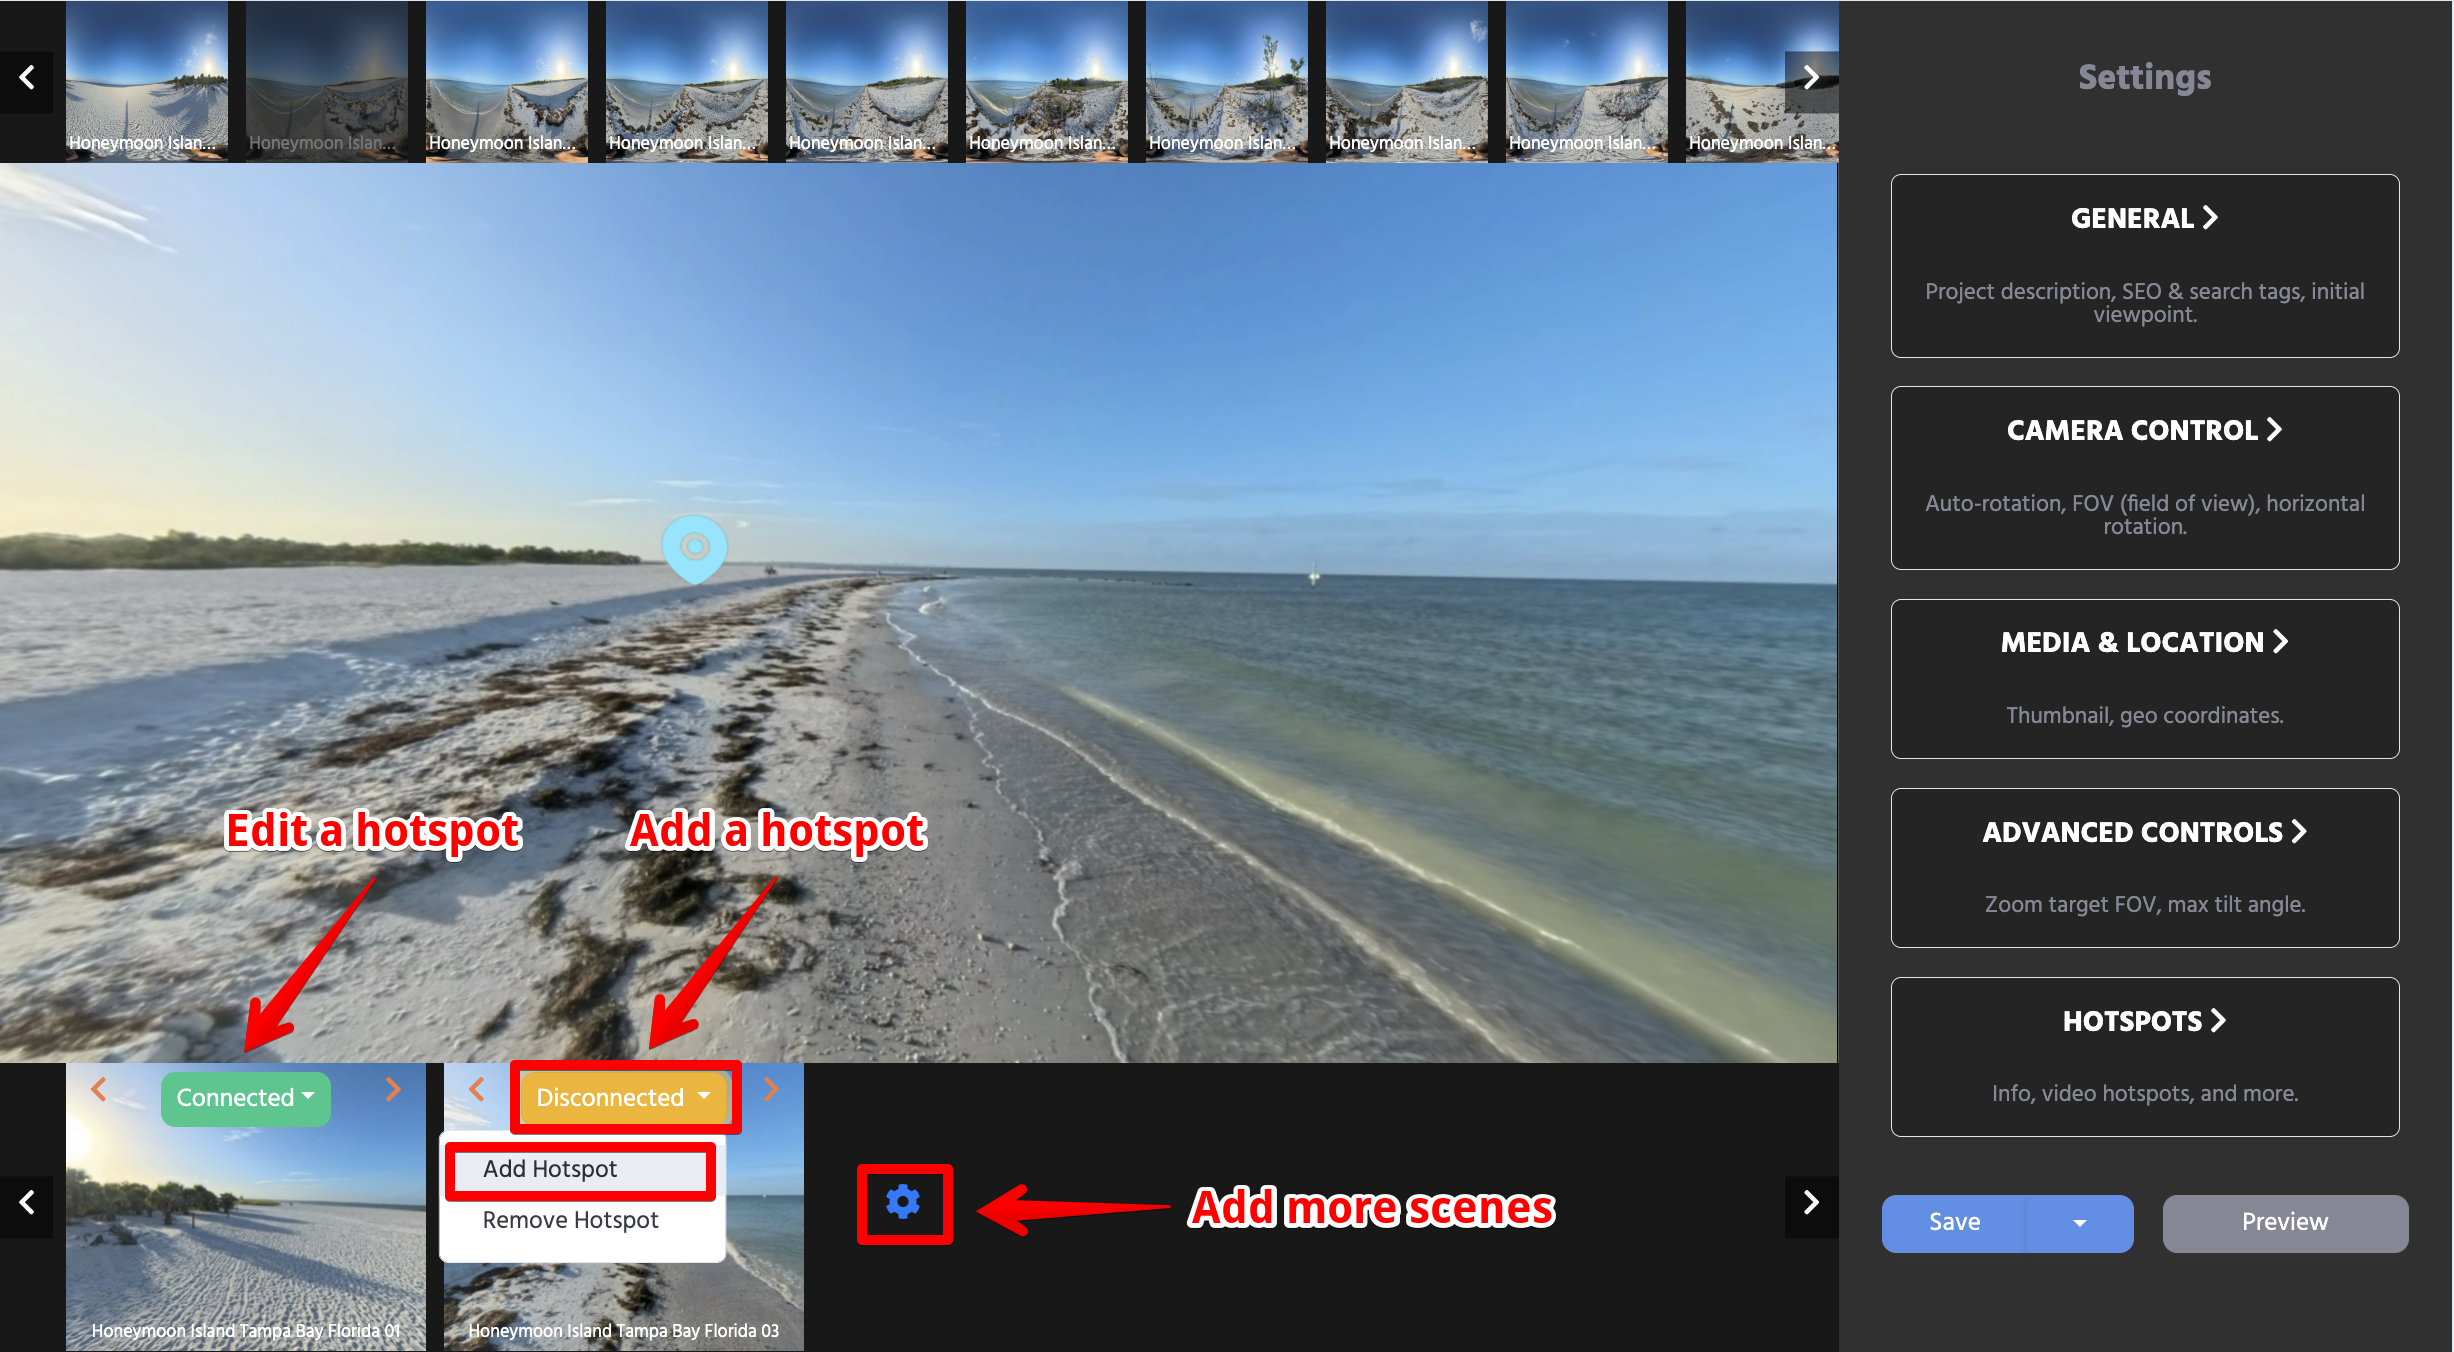
- Modify the hotspot as needed by clicking Edit Hotspot or pressing the hotspot itself and following the above steps.
See Virtual Tour Hotspots: Types and Setup for the available transition icons and information popups.
Step 6: Customize Your Virtual Tour
After adding scenes and hotspots, customize how your virtual tour appears and behaves before sharing it.
Go to Tour Configuration Options to learn how each setting works in detail.
Common configuration options include:
- Project Description — add a clear description of the tour so visitors understand what they are viewing.
- SEO/Search Tags — add meaningful tags to help organize the tour and improve search visibility.
- Set Initial Viewpoint — choose the first camera angle visitors see when the tour opens.
- Generate Thumbnail — create a custom thumbnail image from the current panorama view.
- Scene Navigation — enable a thumbnail drawer so visitors can jump between scenes.
- Enable AI Chat — add AI Chat support when available for your account or add-on.
- Camera Control — adjust auto-rotation, auto-rotate delay, field of view, pitch, and roll.
- Geo & GSV — add latitude and longitude when location information is important.
- Advanced Controls — fine-tune zoom behavior and vertical viewing limits.
- Preview and Publishing Options — save as draft, preview the tour, publish it, or save it as private.
For a complete explanation of all settings, see Tour Configuration Options.
For additional navigation, see Add an Interactive Floor Plan to a Virtual Tour. If your plan includes it, follow AI Chat for Virtual Tours: Setup and Usage to prepare and enable visitor assistance.
Publishing: FREE users can build and preview draft tours. Publishing a complete tour requires PLUS or BUSINESS; see current plans.
Need Help?
If you encounter any issues while following the above steps, feel free to reach out to our support team via contact form.
Start showcasing your 360-degree photos and building amazing virtual tours today with 360are!